Horses Under Fire
By: Tricia McMaster
Cowboy mounted shooting is one of the nation’s fastest growing equestrian sports. Mounted competitors are encouraged to wear old west period clothing and use old style saddles and tack. Each contestant carries two single action .45 caliber revolvers of the style available in the late 1800’s. Each revolver is loaded with 5 rounds of specially prepared blank ammunition. The courses of fire or stages consist of two parts of five targets each. The first part is called the random pattern and it varies with each stage (there are currently 35 different stages recognized by CMSA). This random pattern requires the horse and rider to use several training skills, such as; accelerate quickly, stop and turn, rollbacks, barrel turns and rate their speed. The second part is called the rundown and consists of 5 targets placed in such a fashion that the horse is progressing in a constant forward motion at top speed. This is usually a straight line, but circles have also been seen. This requires the horse and rider to race past the targets as fast as the rider can cycle the single action gun and still accurately hit the targets.
On a typical stage, the competitor crosses the timing beam with his first gun drawn and gallops to the first five targets. Upon completion of the first five targets, the rider proceeds to turn the first barrel ell and races toward the end of the arena while holstering the empty gun and drawing the second gun. At the far end of the arena, the rider turns the rundown barrel and proceeds to engage the five remaining targets at full speed.
The scoring for the event is based on a total of elapsed time plus any penalties that were added. A 5-second penalty is added for any missed targets, a knocked down barrel and a dropped gun. The fastest time wins that stage. The combined totals of all the stages in an event are then added up to produce the winner for that match.
As you can see from the obstacles encountered by horse and rider, the pair had better have at least a good working relationship in order to succeed at this sport. This brings us to the crux of this article, the mounted shooting horse and how to tell if you have one or how to test a new one before you buy it.
Horses used in mounted shooting events can be of any breed. The most common breed of horse found in Cowboy Mounted Shooting is the American Quarter Horse. Regardless of the breed you own or choose to buy, your mount’s indoctrination into shooting events must be done with some common sense and caution.
If you already own a horse that you wish to use for this sport, you will need to test him for a tolerance to gunfire. Since you already own a horse, this step needs to be taken slowly. It would be a shame to ruin your chances of using your own horse because you tried to rush him and thus scared him beyond recovery. I recommend taking the horse to matches and letting him “hang out” around the gunfire. Being tied to the trailer or tied close to the arena is wonderful training. This will allow you to observe the horse’s reaction and adjust accordingly. If he shows little or no trauma to the gunfire, try riding him around the other horses. This gives your horse confidence and lets him see that the other horses aren’t bothered by the noise. The next step will be very easy if you were able to allow your horse to acclimate to gunfire at some matches first.
To start shooting off your horse, or to test a prospective mount, try the following ideas. A good way to start a horse is with the use of a .22 caliber “Starter Pistol” (can be purchased at sporting-goods stores for around $27.00). These guns are city limit legal because they are incapable of firing a projectile of any type. I recommend you get an assistant for the first gun test on any horse. One person fires the gun while the other person rides the horse. I believe this is the best way to start the horse to new sounds or things that are potentially scary to the horse. The premise is that a well trained horse knows that the rider will punish him if he does wrong or misbehaves, but the horse isn’t sure if this new sound is a threat or not. Therefore, in most instances, the horse is more concerned about the rider then the new noise. While the assistant is firing the .22, give the horse something to do. DON’T JUST SIT THERE, RIDE THE HORSE! I start by putting the horse through a simple exercise, like a slow lope around in a circle (use of a round pen is ideal). If the horse has never been around gunfire, or if you are testing a prospective mount, start by having the assistant stand outside the round pen and fire off a few rounds when the horse is at the farthest point away from him. We continue to slowly move closer and closer to the horse, until the gun can be fired in the center of the circle I am loping around. Be sure to lope the horse in both directions so that “both sides” of the horse learn that the gunfire won’t hurt him. We also let the horse smell the gun after it is fired. We rub it on the horses’ neck to show that the “smelly gun” won’t hurt him. If the horse is responding satisfactorily, the gun can now be handed to the rider to fire from the back of the horse while continuing to lope in the circle pattern. The rider then fires the gun behind him and upward (overhead) to allow the least amount of concussion to the horse. Fire only one round, then praise the horse, stroke his neck, etc. Continue in this fashion until you are firing off two or three rounds in a row with little or no bolting, spooking, etc. Again, be sure to fire the gun off both sides of the horse. This is very important. At this time, if all has gone well, we repeat the entire procedure with the .45 caliber revolver loaded with the blanks you will be using. This step usually goes much faster because the foundation of praise is already established. At this juncture, we bring out a couple of poles with balloons and try shooting the balloons as you ride past them. In this fashion, continue to fire from the hip (don’t get any closer to his head until much later in his training to avoid “ringing his bell” and ruining a potentially good shooting horse) while still allowing the horse to experience the balloon breaking at the moment the gun goes “bang”. The balloon blowing up is always a surprise to the new horse in the beginning!
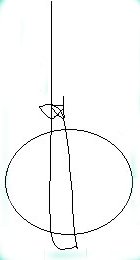
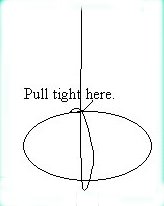
I would like to take this opportunity to advise the use of earplugs for your horse. These are highly advisable for the new shooting mount. In most cases, the earplugs will help the horse adjust to the sound and will allow you to advance your training schedule much faster than without them. We use a smurf-type toy cat ball (about golf ball size) that can be purchased at grocery stores or pet shops. We choose the “softest” ones we can find (your fingers should almost meet in the middle of the ball). They come four to a pack, but you only get one of each color. We usually get several packs so we can match colors for each set we make. We use a brown saddle thread (heavy duty thread or light weight string), to connect the two balls together. Use enough string to lace it under the bridle at the crown so they won’t be lost when the horse shakes his head. Use a needle to thread the string through the ball (1). Loop the string and thread it back through the ball, allowing enough space (1/4” to 3/8”) between the exit and entrance holes. Tie a slipknot and tighten string through the ball until it looks like a “pumpkin”(2). Now tie the other end to the other ball in the same fashion. Voila, earplugs! There may be a “learning curve” for your horse to accept the feel of the earplugs. Be reassuring and persistent. Just keep working at it because most horses (some never take to this procedure!) will come to appreciate them during the matches, especially if you plan to shoot up by the horse’s head while going fast to maximize your speed on the rundown. My husband leaves the earplugs in his horses’ ears all during the match because the horse is more comfortable with this, as opposed to pulling them out frequently (this part he hates!). Other riders put them in for each run and remove them after the run. Do whatever helps your horse to be the most comfortable for this activity.
| Use needle and saddle string to thread through ball. Return through ball tie a knot. |
 |
Slide knot down string and tighten through ball until ball looks like a pumpkin |
 |
If you have access to a gun trained horse, use him to train the new mounted shooting horse. We ride the trained horse and fire the gun. Ride the trainee around while the shooting is going on. The idea is to work your way closer and closer to the shooting. The goal is to be riding next to the gun horse while the gun is being fired on the opposite side from the trainee. If you can do this, it is time to try shooting off the back of the new horse. Follow the steps above regarding the actual shooting for the first time.
When we go to check out a prospective mount, we take the starter gun, the .45 revolvers and ammo for both and at least 2-3 poles and cones along with balloons. I view it like this; if I were going to buy a jumper, I’d make real sure he could jump before I took him home! We test the horse for soundness, pattern aptitude and then for shooting (using the above method starting with the starter pistol and ending with the .45).
To test for pattern aptitude, I use this technique. I guide the horse through a short/simple pattern (i.e., figure eight around two poles or barrels). Take him through the pattern 4 or 5 times in the exact fashion each time. I usually travel at a trot. Give the horse all the help, cues and guidance in the world to insure his success. On the 6th go through the pattern, withdraw all the guidance once the horse is aimed at the first obstacle. If the horse starts to turn the obstacle on his own, this is a very good sign. If he continues right past without even “blinking” (a figure of speech), this shows no aptitude at all. Now granted, this can be trained into the horse, but obviously a strong aptitude or desire to run patterns would be preferable to none at all. After all, this is to be your partner in this game and the more he likes it, the better you both will do at it and the more fun you both will have doing it.
Now that you are well on your way to having a gun broke horse, you are ready to begin the job of becoming a team for this new sport (YES - you and your horse are a team - IF YOU’RE NOT, YOU SHOULD BE!). At this point, you and your new horse should be working on being around as much gunfire as possible and gaining confidence on as many aspects of mounted shooting as possible. If the horse is still having trouble with balloons, try tying lots of balloons around his stall or paddock. This works especially well if the balloons can be secured around the feeder. The horse has to go past the balloons to eat. Since a horse is always hungry, this will gain you the quickest possible results. You could also turn a horse out in a round pen with a few balloons to play with, or hang one/some from the saddle and let him run off his fear. This happens quicker with each turnout with the balloons attached to the saddle. Eventually the horse will ignore the balloons (the desired result!).
I feel it is important to vary the horses’ training. Hopefully, you will not find yourself in the position of "Every time you take the horse out of the stall, its to go shoot balloons!" This will definitely undermine your efforts. Granted, you are all gung-ho over this new sport, but chances are, your horse isn’t. Try to give the horse a break now and then. I like to go on trail rides for a change. This is very relaxing for both the horse and rider. It allows you to bond with your horse and get to know him in a way that can’t be duplicated in the arena. While on your trail rides, be sure to practice navigating some natural obstacles. For instance, at a wide spot in the trail, navigate a turn around a tree or bush (instead of a barrel). It will also be helpful to travel toward obstacles up ahead on the trail instead of meandering wherever the horse wants to go (duplicates the traveling in a straight line between barrels on some of our stages). The speed is not the issue here, control is. Be sure you are traveling where YOU want and not where the horse just happens to be heading. The difference is very subtle. The operative point here is: Be sure you are choosing and not the horse.
Continue to practice on various patterns (all 34 are available on the internet at www.acmsa.com or at the www.cowboymountedshooting.com web sites) with the guns and holsters of choice. Be sure to go through all the motions just like a real stage. Try dry firing (check with manufacturer’s instructions or talk to other experienced shooters for further information on dry firing your make of gun) at the targets while navigating the patterns. Do not start this exercise at full speed! That would be detrimental to both the horse and rider. Start at a trot or lope and help the horse navigate the turns on the course of fire. As the horse gains confidence in "running patterns" or turning the barrel/poles, the rider can increase the speed of travel. If the new horse has difficulty traveling forward willingly, try following a seasoned or well-schooled horse around the course. This seasoned horse need not be a gun-trained horse, as you are only dry firing at this time. We have found that a horse that lacks confidence will usually travel forward willingly when given a confident horse to follow. Try not to overdo the following aspect to the point of dependence though. Practice your rate of speed around the obstacles while simultaneously practicing the drawing and holstering of the guns. This helps you acquire your timing in regards to the speed of the horse, as well as fine-tuning the use of the single action guns with the most efficient use of the holsters to suit your specific needs and style. I set up a course of fire, complete with balloons and practice the course with the starter gun several times. I also use the regular .45 caliber guns to dry fire while running the courses to enable me to practice switching guns on the run. I practice these exercises as often as I can in our home arena. This part is very important and is often overlooked by experienced rider/shooters. Since they don’t need the practice, they forget that the new horse still needs to feel you shifting your weight to replace a gun, etc. I have found that certain horses do better if the guns are returned while rounding the barrel, while other horses do better if the first gun is replaced while on the straightaway between barrels. Obviously, you and your new teammate with have to work this out for yourselves.
Try not to use the same patterns all the time. Try to mix them up for your sake as well as your horses’. I don’t want my horse to memorize the patterns; I want him to listen to me and wait until I tell him to turn. In this manor, the horse won’t become confused when he sees a familiar pattern, but you have been told to run it in a different way! Try to train the horse to be aware of obstacles, and to expect a signal from you as one approaches. In other words, when my horse & I come to an obstacle, he gathers himself up, because he knows something is going to happen (turn, circle, pass between, etc.), but he waits for my signal as to which way we are to go. Obviously, this training method takes longer, but is well worth the effort.
Concurrently with the aforementioned training, be sure to get in as much gun practice as possible. When within the city limits, use the starter gun in single action mode to garner as much training as possible for both you and the horse. The horse anticipates the bang whenever he hears the click of the hammer being pulled back. One point I would like to bring up again; do not burn out your horse doing the same thing all the time. If you need to practice shooting more than the horse does (as in the case of a new rider and seasoned horse), try shooting balloons set on bushes out in the desert or as part of your trail ride in the open country. These targets could also be set up in a wash where you could even practice at an increased speed. Washes are great for building up leg muscles and stamina on the horse and rider as well.
THE KEY TO THIS GAME IS A GOOD HORSE, A GOOD AIM AND
PRACTICE, PRACTICE, PRACTICE!